Difference between revisions of "iPhone Configuration"
(→Automated Configuration (version 3 servers)) |
|||
| (7 intermediate revisions by 4 users not shown) | |||
| Line 1: | Line 1: | ||
| + | {{1 prefix}} | ||
| + | |||
| + | = Special Notes = | ||
| + | |||
| + | * iOS, along with most mobile devices, works best with IMAP. POP3 is an option with these devices, but it is less suited to the 'sometimes on' nature of mobile data services. | ||
| + | * IMAP support on our older servers isn't completely compatible with iOS Mail and may not work as expected. The "version 3" platform servers are compatible with iOS, without known issues. | ||
| + | |||
| + | = Automated Configuration (version 3 servers) = | ||
| + | |||
| + | Point your iOS device's browser to https://autoconfig.he.net/ and enter in your name and email address and touch the Submit button. A screen similar to the following will show up. | ||
| + | |||
| + | {| width="50%" | ||
| + | |- | ||
| + | | width="40pt"| | ||
| + | | [[File:iOSAutoEmail1.png]] | ||
| + | |- | ||
| + | |} | ||
| + | |||
| + | After touching "Install", you will be asked to confirm that you want to install this profile. Touch "Install Now" You should then see a screen similar to the following, asking for your email password. | ||
| + | |||
| + | {| width="50%" | ||
| + | |- | ||
| + | | width="40pt"| | ||
| + | | [[File:iOSAutoEmail2.png]] | ||
| + | |- | ||
| + | |} | ||
| + | |||
| + | After this step, your email is configured the same as it would be with the manual setup. If you have need to remove the email account from your device, simply go into "Settings", "General", "Profiles", select the profile matching the email address you want to remove, and touch "Remove." For iOS8 and later, just remove the email account as normal, and that will remove the associated profile. | ||
| + | |||
| + | = Manual Configuration = | ||
| + | |||
=== Select Add Account from the Mail Settings Menu === | === Select Add Account from the Mail Settings Menu === | ||
| Line 39: | Line 70: | ||
Incoming Mail Server | Incoming Mail Server | ||
| − | * Host Name: | + | * Host Name: your_domain.com |
* User Name: Your email address. | * User Name: Your email address. | ||
* Password: Your email password. | * Password: Your email password. | ||
| Line 52: | Line 83: | ||
Outgoing Mail Server | Outgoing Mail Server | ||
| − | * Host Name: | + | * Host Name: your_domain.com |
{| width="50%" | {| width="50%" | ||
| Line 61: | Line 92: | ||
|} | |} | ||
| − | Then select '''''Save'''''. | + | Then select '''''Save'''''. ''Note'': The iPad doesn't have this option, just "Next". You have to choose that, then wait for it to time out. This can take several minutes. It should come back saying "Cannot Connect using SSL. Do you want to try setting up the account without SSL?" Select "Yes." |
=== From the Mail menu, go back into your settings for this account === | === From the Mail menu, go back into your settings for this account === | ||
Latest revision as of 10:52, 19 December 2015
This information only pertains to Hurricane Electric's Shared Web Hosting package. There may be different information in our other categories.
Contents
- 1 Special Notes
- 2 Automated Configuration (version 3 servers)
- 3 Manual Configuration
- 3.1 Select Add Account from the Mail Settings Menu
- 3.2 Select Other
- 3.3 Enter your basic account information
- 3.4 Select the IMAP button at top, then enter the following information
- 3.5 From the Mail menu, go back into your settings for this account
- 3.6 Select SMTP and enter 587 in the Server Port field
- 3.7 From the previous menu, go to Advanced
Special Notes
- iOS, along with most mobile devices, works best with IMAP. POP3 is an option with these devices, but it is less suited to the 'sometimes on' nature of mobile data services.
- IMAP support on our older servers isn't completely compatible with iOS Mail and may not work as expected. The "version 3" platform servers are compatible with iOS, without known issues.
Automated Configuration (version 3 servers)
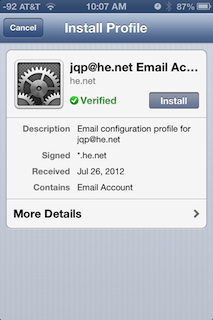
Point your iOS device's browser to https://autoconfig.he.net/ and enter in your name and email address and touch the Submit button. A screen similar to the following will show up.
|
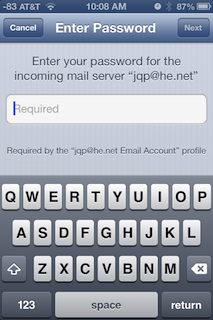
After touching "Install", you will be asked to confirm that you want to install this profile. Touch "Install Now" You should then see a screen similar to the following, asking for your email password.
|
After this step, your email is configured the same as it would be with the manual setup. If you have need to remove the email account from your device, simply go into "Settings", "General", "Profiles", select the profile matching the email address you want to remove, and touch "Remove." For iOS8 and later, just remove the email account as normal, and that will remove the associated profile.
Manual Configuration
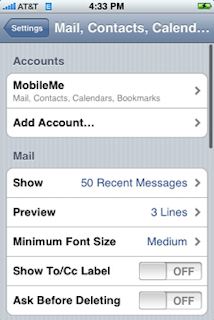
Select Add Account from the Mail Settings Menu
|
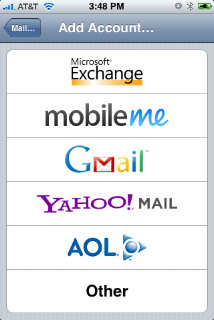
Select Other
|
Enter your basic account information
- Name: Your name.
- Address: Your email address.
- Password: Your email password.
- Description: Description of the mail address. You can put anything in this field ("HE Email" as an example).
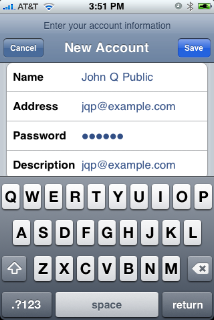
|
Then select Save.
Select the IMAP button at top, then enter the following information
Incoming Mail Server
- Host Name: your_domain.com
- User Name: Your email address.
- Password: Your email password.
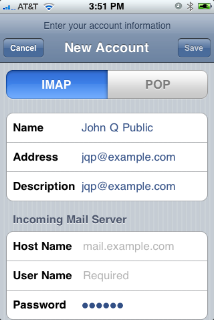
|
Outgoing Mail Server
- Host Name: your_domain.com
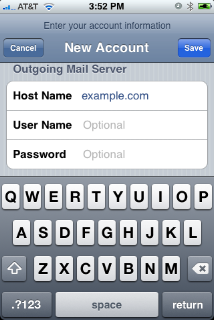
|
Then select Save. Note: The iPad doesn't have this option, just "Next". You have to choose that, then wait for it to time out. This can take several minutes. It should come back saying "Cannot Connect using SSL. Do you want to try setting up the account without SSL?" Select "Yes."
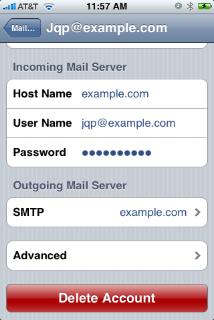
- Make sure that it is turned on.
- Your settings should be similar to the following images.
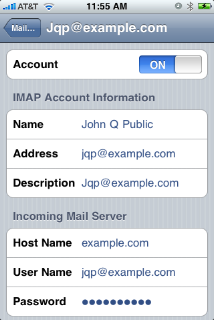
|
|
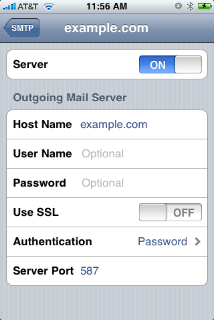
Select SMTP and enter 587 in the Server Port field
|
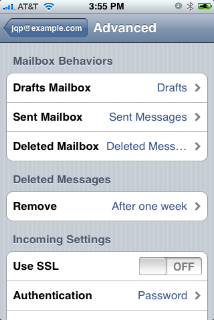
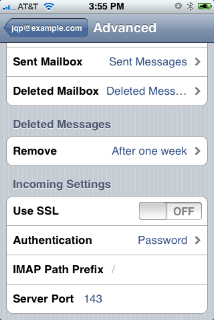
It should look similar to the following images. Be sure that Use SSL is set to off and the Server Port under Incoming Settings is listed as 143.
|
|
You should now be able to send and receive mail with your iPhone.